|
(click on pictures for larger views) |
|
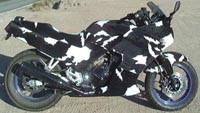
My 1999 Ninja 250 |
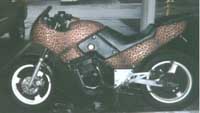
Matt G's 1986 Ninja 250 |
Included below are some helpful hints and suggestions for furring a Ninja 250 or other sportbike. Though this will not serve as a step-by-step list of instructions, the information will still guide you through the process. Coming from the experience of furring my Ninja 250, I should be able to help you make the best of your fur! 
TIME:
Furring your sportbike is not for the lazy and impatient! Furring the bike takes a great deal of time... even more so if you decide to revert back to the original look of your bike before you applied the fur. I spent approximately 12 hours furring my bike and could have spent several dozen more hours if I wanted everything to be absolutely perfect. If you decide to reverse the process later, it won't be easy. Though you can still ride the bike with several of the fairings off, you will want to budget at least 12 hours for furring the fairings. You can do it in less time, but you may not be happy with the results.
IDEAL CANDIDATES FOR FUR:
Furring the bike is definitely a way to make your bike unique. Yes, it's an enormous conversation starter. Yes, almost everyone loves it. Yes, people respect you for it and think it's a "talent" to do such a thing. But there are only two circumstances in which I would ever fur a motorcycle. My bike had damage from two crashes and 36,000 miles on an engine that doesn't last much more than that. Because of this, it no longer had much of a resale value at all. This made it an easy decision to fur the bike. It was inexpensive fairing repair!  I recommend furring your sportbike only under two conditions:
|
1. The bike's fairings were severely damaged due to a crash or similar incident... in which case it would cost several hundred dollars to repair and repaint. If it's an older, high-mileage Ninja 250 like mine, it's certainly worth furring it, as opposed to almost spending the bike's entire worth on new plastics and paint. 2. The bike's paint job and/or stickers are fugly, but you don't want to repaint it just yet. In this case, the fur can be a fun and "different" way to show your bike, as opposed to the fugly paint and/or stickers. |
ITEMS NEEDED:
Aside from time and work space, there are only two ingredients to furring your bike: fur and spray adhesive. I purchased 4 yards of cow-print fur at $17/yard and spent $13 for a spray can of 3M adhesive. That's a total of roughly $80 to fur my bike. Depending upon the quality of fur fabric you buy, your cost will vary. Typical cost for the fabric is $15-20/yard. The fur I used was "rated" as a standard, indoor material. In fact, the saleswoman cutting the fabric warned me about that. "You realize this fabric isn't made for outdoor use, right?" She knew exactly what I was doing with it, given that I was holding my helmet as she cut the fabric. It was safe to say I wasn't the first guy to come into the store for this purpose. The fabric was indeed "furry," with about the same thickness and texture as velvet. The only major difference was that this fabric had a typical backing to it, as opposed to just being plain fabric. Beware of the animal print cloths at the fabric store. They're not furry, they're very thin, and you would probably see lumps through the fabric if you used it on your bike. You might even end up seeing the color of your bike through the cloth! Get the slightly thicker, furry fabric. My fabric isn't as thick and dense as carpet, but it's nice stuff and easier to work with than thick carpet-type materials. So long as you don't have to re-do any of the fairings more than once or twice, you likely won't need any more than one (large) spray can of adhesive. I used 3M Super 77 Spray Adhesive. It works really well! You can find it in any fabrics or crafts store. Though not absolutely necessary, it really helps to have access to a staple gun. Using only spray adhesive to adhere the fabric to your seat will more than likely result in wrinkles and a terrible look. Simply put, moving around on your seat is enough to stretch and move the fabric. It helps to hold the fabric in place by stapling it to the underside of the seat, much like the way standard seat covers are installed. Typical T-50 staples will do the trick.
THE PROCEDURE:
Begin with a small, flat fairing. This will help you familiarize yourself with the precedure before tackling the more difficult fairings. On the Ninja 250, the two side covers are nice pieces to start with. Begin by laying your fabric out on a work table, with the furry side face down. Then take your first fairing off and lay it on the fabric. If there are any lights, reflectors, or other items on the fairing, remove them. Much like wrapping a birthday present, you can now see just how much fur you need to cut for this fairing. Keep in mind that you will want to fold the fur around the edges of the fairing. This will hide the seams on the inside of your bike and also help prevent the fur from coming off when riding. With a pair of scissors, cut the fur, making sure to leave yourself plenty of extra fur to account for any contours in the fairing. If your fairing has any "holes" in it, you need to decide whether you want to cover over them completely or cover them so they remain as holes. I opted to cover over them completely, which is much easier to do.
Once you have a section of fabric cut, clear away the remaining fabric so it is out of the way. Turn the fabric and fairing over so that the fairing surface points up and the fabric is on top of the fairing. Position the fabric just like it will be when finished. Then peel back one side or corner of the fabric. Apply the spray adhesive to only the fairing surface. The spray adhesive instructions will recommend spraying both surfaces (the fairing and the fabirc). But spraying the fabric can result in discoloring that could be visible from the outside. Give the adhesive about 15-20 seconds to turn tacky. Then fold the fabric back down over the adhesive. Work slowly and only fold down the fabric in small steps. As wrinkles develop, pull on the fabric to straighten them out. Once the fabric is all down on the fairing, run over it a few times to flatten everything out. Then unfold the next section of the fairing, apply spray adhesive to the fairing, and repeat the process of laying the fabric back down on the fairing.
Warning: The adhesive is sticky... and that's why you use it. But if you get adhesive on your hands, you're going to make your job much more difficult. With adhesive on your hands, you won't be able to touch your fur to flatten it out and remove wrinkles. Do everything within your power to prevent getting the adhesive on your hands. Believe it, it's easier said than done. Even being careful is often not enough to prevent getting adhesive all over your hands.
When the ouside of the fairing is complete, you can then turn the fairing over and adhere the edges of the fabric to the inside of the fairing. Spray the adhesive on the fairing, then fold the fabric around the edge of the fairing. You may need to hold the fabric to the fairing for a few seconds to make sure it holds well. This is the part of the fabric undergoing the most stress.
If you covered mounting hardware holes in the process, don't worry about it. Before placing the fairing back on the bike, you can re-open these holes by poking them with a utility knife. I prefer to use a hobby knife, such as the X-ACTO brand knife often used for model airplanes and other crafts. Using the knife, you can slice an "X" in the hole. Make the "X" only as large as needed to fit your mounting hardware in the hole. If you do it this way, your hardware will "disappear" in the hole, giving your bike a nice, clean look.
Work through the fairings one by one until each fairing has been removed and furred. If you want to save the most difficult fairings for last, the Ninja 250's most difficult fairings are the large front fairing and the front fender. Keep in mind which areas you will be able to see on the bike and those areas you won't be able to see! You can cut corners by being sloppy in areas that won't be visible. For example, when you take off your front fender, you will notice some very wicked curves and shapes! But keep in mind where your fork tubes rest. You won't need to have perfect, wrinkle-free fur on the inner curves of the fender if the fork tubes are just going to rest right against it and hide it! Use this same philosophy to shave some time here and there.
CLEANING THE FUR:
Though I place 17,000 miles per year on my bike, I do so in Arizona. So I'm not accustomed to seeing rain that often. In the first six months of 2002, Phoenix has a recorded rainfall of 0.19 inches! But I have seen my share of construction zones and puddles. With the construction taking place near my house, I regularly splash mud and water up on my bike! Though your instinct will be to get that crap off your bike, the trick is to just leave it alone! When the water evaporates and the mud dries, it will be much easier to clean off. If you try to wipe it off or mess with it while wet, you'll just grind that stuff into the fabric. Once it dries into a layer of dirt, you can use a vacuum hose to remove the dirt. I use a shop vacuum and esentially "scrub" it off with the end of the vacuum hose. A brush with soft, clean bristles would probably work just as well. If you let the mud fully dry into dirt, you will be surprised at just how easy it comes off without staining the fur. The white parts of my fur are still bright white!
SOME FINAL WORDS OF ENCOURAGEMENT:
Yes, it is truly a pain in the butt trying to get a flat fabric to form to complex curves such as the ones on your bike's fairings. Placing the fur and stretching it to prevent wrinkles is not easy. But rest easy knowing that it can and has been done by dozens of people. The process is tiresome, but the results are amazing. I am quite happy with how my fur turned out... and hopefully you will too! If you end up furring your bike, send me some pictures of the final look!